Sunday, August 29, 2010

Day of Rest


Friday was our day off. I worked all day Saturday, so Matt took Friday off, and we had our Saturday. Recently we have been in discussion with others about taking a Sabbath Day. A true Sabbath - a day of total rest, rejuvenation, and reflection on the goodness and grace of God. What a beautiful concept. In Jewish tradition, Shabbat begins Friday night and ends Saturday night. I think I am really in love with this concept, it is a day to look forward to and conjures up the mental image of Tevye and his family rushing to get everything ready for the rituals of the Friday night meal.

So far Matt and I have had two Sabbath days, or rather attempts at a successful, restful Sabbath. We've made grocery store trips, which I would like to eliminate from the day, and we have incorporated TV and technology, which some would say are not appropriate Sabbath day activities, as it distracts and separates you from a quiet, restful time spent with family and friends, or spent with rejuvenating activities. I haven't decided whether movies and the like should be illuminated (I think it should definitely be kept to the minimum), as Matt and I really enjoy cuddling up on the coach for 2 hours and watching a movie. I will have to consider this more. If any of you have a thought on the use of televised entertainment during a day of full rest, please comment.

So Friday went something like this.....

Wake up late, get up and bake some chocolate chip scones, brew some coffee, and enjoy with a side of the daily show. John Stewart is pretty much always appreciated in our house.

Then the infamous grocery store run. We picked up ingredients to make a dessert to share with friends that evening.

The afternoon was spent baking, and assembling this beautiful Strawberry Kiwi Tart. It was delicious with a shortbread crust, a thick coconut cream, topped with fruit and glazed with heated strawberry preserves. The only issue I had with this otherwise incredible dessert is that the cream turned a grayish color as it cooled. This may have been due to the bananas that were beat into it and perhaps browned, but that may not be the case.

We also had some couch/cuddle time while watching the movie Temple Grandin, which was a great movie. Claire Danes did an amazing job, and now I want to listen to interviews with the real Temple.

Matt went for a run while I gave myself a manicure and pedicure of sorts, then we got ready and were off to visit with friends for the evening. We sat on the porch and enjoyed wine and dessert, conversation, and the beautiful night.


This is my favorite picture of the day. How we feel trying to get a good picture of ourselves while taking it ourselves. " Lets try again, just one more."

Some may not want the work of preparing food on their day of rest, but I quite enjoy the opportunity to try a recipe that's been waiting for the perfect day. Last week we did just that and made Mexicali Sliders and Cajun Sweet Potato Fries. Delicious! I went a bit overboard and now have a large freezer bag full of the black bean burgers in the freezer.


We also made these Beach Cookies from the same blog. Yummy yummy. I used a bit to much shredded coconut, but it was still delicious.


So we have a lot to work on with our day of rest to make it truly that. We will see how it goes this coming Friday. My goal is a picked up house and dishes done before the day starts so it is not staring us in the face the entire time.

If any of you have tried to incorporate a Sabbath day into your routine, I would love to hear about it.

Wednesday, August 25, 2010

Fattoush!

I kind of love saying the word fattoush. It sounds like a declaration of sorts, and makes me giggle listening to the pronunciation on this site. This Mediterranean dish is traditionally Lebanese I believe, and is delicious. Comprised of cucumbers, ripe tomatoes, and fresh herbs tossed in a light vinaigrette, it is packed with flavor. Although a great salad on its own, the toasted bread really ties it all together. Plus it soaks up the dressing and makes you want some bread with every bite, as it is packed with flavor. Yummy!

Fattoush

cucumber, diced
tomatoes, diced
bell pepper of choice, diced
onion, diced
(these are the main vegetables that I used in this dish, but add more. Chopped romaine or lettuce, scallions, green onions instead of regular onion)
small bunch of cilantro leaves, fine chopped
(I only had cilantro, but fresh mint and parsley were recommended in the recipe I used, so go for it)
garlic clove, minced or crushed

Choose the quantity of salad that you would like to make and chop the amount of vegetables needed to create a nice mix. Mix together on a plate or in a serving bowl.

olive oil
fresh lemon juice (at the time of making this salad I did not have any lemons, so I substituted red wine vinegar - it tasted good too)
salt and pepper to taste

drizzle olive oil on the salad and then squeeze on some lemon juice. Season with salt and pepper. Toss to combine.

Now for the yummy croutons!

Salt and Pepper Croutons

1 loaf of french or sourdough bread or bread of choice, cubed (or just cube up enough for one salad if that is all you are making)
olive oil
salt and pepper

Preheat oven to 400 degrees F. Place bread cubes in a pie plate or larger size baking dish.
Drizzle on a couple tablespoons of olive oil (enough to coat each cube a bit). Salt and pepper to taste (don't be to shy). Toss together to evenly coat and season the bread cubes (using my hands seemed to work best for me). Bake in the oven for 15 min or until toasted and crispy.
Throw these on top of the salad and enjoy!

I was so excited about this salad when I made it, especially the croutons. Matt is a bread lover, so I wanted him to enjoy it as well, but he does not like cucumber nor does he like lemony dressings. So I made up this dish for him.

Bruschetta Fattoush or Deconstructed Bruschetta

Tomatoes, chopped
onion chopped
garlic, minced
olive oil
balsamic vinegar
salt
salt and pepper croutons
fresh basil strips

Again chop up the amount of tomatoes, onion, and garlic needed. General rule would be lots of tomatoes, a nice sprinkling of onion throughout the dish, and just a touch of garlic (the finer it is minced the better). Drizzle on some olive oil and balsamic vinegar (2 parts olive oil to 1 part vinegar). Season with salt. Top with basil strips and croutons. No more bruschetta falling off your bread problems!


Fattoush is definitely on my list of favorite salads. Let me know what you think.

What is one of your favorite salads?

Sunday, August 22, 2010

Amazing Kale

I absolutely adore kale. Although I do tend to buy it every week and then put off using it, and therefore feel bad about it sitting in my fridge wilting and losing nutrition. Something to work on!

It is such an amazing powerhouse of nutrition. Kale is high in calcium, iron, vitamin A,C, and K, and lutein. It has lots of beta-carotene and is a cancer fighting vegetable. You can't beat all of that! I use kale in green smoothies, green juices (my favorite being kale, apple, and lemon), and my all time favorite Kale Chips. Kale chips can be made raw using a dehydrator or baked in the oven. I prefer them raw as it keeps the nutritional enzymes in tact and has more of a fresh kale taste. They are still delicious baked, just make sure that you don't let them burn.

Try this recipe even if you don't particularly warm to kale. You might enjoy eating it this way. It definitely dispels my chip cravings as it is salty and crisp.

Kale Chips

1 bunch of kale
1 tablespoons olive oil
Salt to taste
Seasonings of choice to taste (garlic powder, onion powder, paprika, season salt, ect.)

Wash kale thoroughly and dry with a clean towel. Tear into fairly large pieces (these shrink down a lot in the drying or baking process) and discard the big parts of the stem. Place in a large bowl. Preheat oven to 300 degrees F.

Drizzle on the olive oil. A little goes a long way in this dish. With clean hands, get in there and massage the oil into the leaves so that each leaf is coated.

Sprinkle in your seasonings and distribute evenly using your hands again.

Spread them out on a baking sheet covered in parchment paper. Bake in preheated oven for 20 minutes or until crisp. Make sure you watch them so you can prevent them from burning.

These are how mine turned out. They shrink down a lot.


Alternatively spread out the prepared kale onto dehydrator sheets. Dehydrate for 4-6 hours at 104 degrees F. Once the kale is crispy it is ready to eat.


This is how the dehydrated ones turned out.

Hope you enjoy this recipe. I know it doesn't seem that exciting being that it is a dark green vegetable and often viewed as tough and bitter. But give kale a chance, you might be glad that you did!

Wednesday, August 18, 2010

Cake is Always a Good Thing


Matt and the Communist Party are thrilled to have cake!

This week has been a crazy one. Not so much crazy, more like time consuming. But that ends now that the rest of the week and weekend is mine, not works. There has not been much time to experiment with recipes, but Saturday did leave room for the first attempt at a scrumptious wintery flavored cake. It was not a total success, but was definitely not a total failure either. We were craving cake, so that night I pulled out one of my favorite recipes (chocolate mint) and started pouring the ingredients in a bowl. Then there was one disappointment after another. We had only 1/4 cup of sugar and only 1/4 cup of cocoa powder. Sigh. So the improvising happened. There was brown sugar, so in went 1 cup and a 1/2. I made due with the amount of cocoa powder and decided it would be a light chocolate cake. Then last minute decided to add in some spice flavors - cinnamon, cardamom, all spice, nutmeg - why not. The layers were baked and sampled. It was a bit on the heavy side which probably had something to do with the amount of brown sugar used, but it wasn't unpleasant. There wasn't enough powdered sugar to make frosting for in between the layers, so I whipped up a combination of molasses, maple syrup, and some arrowroot to thicken. It was kind of thick, but ended up sinking into the bottom cake (not bad if you are as in love with molasses as I am). The cake was frosted with a maple buttercream, sprinkled with brown sugar and drizzled with more of the molasses combo. My favorite part was the molasses flavor mixed with the buttercream frosting. The cake recipe will need some tweaking as it was not light enough, but It felt so good to come up with a recipe even if it wasn't perfect. I am excited to try it again and figure this one out!

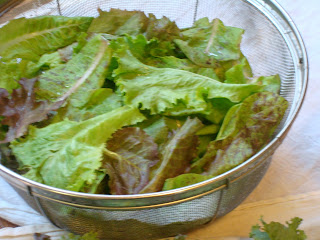
On another note, look at this beautiful lettuce! Tuesday morning I had some time to use up some of the produce from our CSA. The lettuce was washed for my dinner break at work. I washed the kale, cut the up the melon (from the farmer's market), and made some mint tea.


One of my good friends introduced me to Mint Tea. It's an easy thing to make and is so refreshing! All you do is wash up some fresh mint (stalks and leaves), put them in a soup pot with some water and bring to a boil, let simmer for about 15 minutes, lift out the mint, and sweeten with sugar or sweetener of choice. I used some raw honey.

If you would like to make it, I would suggest 1/2 to 3/4 cup of packed mint to 4 cups of water depending on how strong you would like it. Feel free to use more mint as you can always add more water later (the mintier the better in my mind). Sweeten with 4 to 6 tablespoons of sugar, or less. I used about 2 tablespoons of honey, so mine is not that sweet. Enjoy!


Thursday, August 12, 2010

Handy Tip Thursday

Today was the first week that we picked up our CSA (Community Shared Agriculture) produce. I was so excited. Since we had paid for our 10 weeks at the beginning of summer it felt like I was filling a bag for free. Always a nice feeling! This is our 4th year with Country Garden and Farm Market. Today we picked up kale, eggplant, cabbage, lettuce, basil, cilanto, mint, tomatoes, sweet peppers, jalapenos, cucumbers, cantalope, sweet corn, and a random variety of zucchini. Needless to say I am glowing with the excitement of farm fresh local produce in my fridge. I would highly recomend getting involved in a CSA if there is one in your town. Here is a website that will search for one in your area.

There will probably not be a handy tip every Thursday, but today I thought I would share one of my herb saving tricks. Maybe you already know this one, but last year when my mother shared
this trick with me, I was pretty elated. After years of basil going black in my fridge this handy dandy idea was a life saver (or basil saver). So here goes!

First fill a small or large glass, depending on the size of your basil, with just a bit of water (enough to cover the stems about an inch). Put the basil in the glass so that each stem is emersed in the water.
Then simply place a ziplock bag over the basil and the glass. Leave on the kitchen counter for 3 days or more. The longer you leave it, it does tend to get some dark spots, but it definitely lengthens the life of the herb. Just watch out for some leaves that may have grown a bit of mold from the moisture, but if you use it in a couple days this shouldn't happen.

I hope this is a helpful tip! Throughout the summer there is almost always a glass of basil incubating on my counter.


Saturday, August 7, 2010

Basil and Eggplant

Basil is one of those herbs that makes me want to keep on living. The scent is amazing and the taste is incredible, especially when mixed with the right flavors. Pesto is one of the main ways basil is used in our house. Throwing the large leaves in my personal blender does not fair well for a smooth pesto sauce, so I find that the chiffonade style of cutting herbs works quite splendidly. To chiffonade, simply stack clean leaves on top of one another and roll together tightly. Then take a knife and cut across the roll to produce thin strips.

Toss into a blender with a splash of olive oil, some salt, and minced garlic. This is my recipe for pesto. Traditionally there is a nut (pine nuts usually) and parmesan cheese added as well. Pesto is delicious used as a sandwich spread, tossed with hot pasta, or as a base sauce for a pizza.

Raw Eggplant Pesto Pizza is one of my favorite summertime recipes. This recipe calls for a dehydrator, which really helps soften up the eggplant. Alternatively you can put these in the oven and bake them for a bit. I've never tried baking them, but it would be equally delicious.


Raw Eggplant Pesto Pizza

1 good sized eggplant
salt
prepared pesto
3 -4 mushrooms sliced (baby portobellos are good)
olive oil
tamari or soy sauce
fine chopped onion
sliced cherry tomatoes or tomato fine diced

First slice the eggplant into thin but not to thin rounds. You can leave the skin on or cut it off, as it is a bit tougher to chew. If baking, leaving the skin on should be fine. Salt both sides of the eggplant rounds and lay in a colander to drain in the sink. Leave them there for 10 - 30 minutes. This helps soften the eggplant as well as remove some of the bitterness.

Take the sliced mushrooms and put them in a bowl. Drizzle some olive oil on them, about 2 Tablespoons or more if needed. Pour in 1 tablespoon or more tamari and toss together. Set mushrooms aside to marinate for at least 10 minutes or more.

Once the eggplant has softened, rinse the rounds with water and pat with a clean dish towel or paper towel to dry. Spread a layer of pesto on each round and then top with marinated mushrooms (you can drain the marinade off, or just carefully dish out the mushrooms watching to not add to much liquid to the pizzas), tomatoes and onions.

Place these on a lined dehydrator try and dehydrate for 1 - 4 hours at 104 degrees F. The longer they dehydrate the softer they get and the more the flavors meld. Alternatively place on a lined baking sheet in the oven for 15 to 20 min or at 375 degrees F.

Here is a before and after shot of the dehydrating. The eggplant really softens up and the olive oil in the pesto sinks in to make it really amazing.


Here is another quick and easy dinner option using eggplant and basil. Salt and drain peeled eggplant rounds the same as described in the recipe above. Place on a oiled or lined baking sheet and roast for 20 to 25 minutes or until softened at 425 degrees F. Place them in a baking dish and top with tomato slices and basil strips. Then add some salt and pepper and minced garlic. Take some bread and toss into a food processor with olive oil, basil strips, salt, and some more minced garlic. Top the dish with the breadcrumbs and bake in the oven for 25 min at 425 degrees F. You can cover with some foil for the first 15 minutes to keep the breadcrumbs from burning. Enjoy!

Sorry there are not any pictures of the finished dish. I had some store bought breadcrumbs at the time so used those and it did not make for a very pretty plate of food, although it was very tasty. Day old sourdough bread would be perfect to turn into breadcrumbs for this dish.


Tuesday, August 3, 2010

Blueberry Pie and Other Delights!


Sadly, I missed blueberry picking season this year, but have been picking up pints at the farmers markets and it has been wonderful to have fresh blueberries around. They are definitely my favorite berry next to the strawberry. One of the amazing things about blueberries is the gelatin like substance it creates when blended and set. This first recipe takes full advantage of this phenomenon. One of my amazing friends made this pie for me and shared the recipe, so when there were enough blueberries in the fridge, I had to try it. This is a no cook, no bake pie, so it is perfect for those hot summer days.

Fresh Blueberry Pie

crust:
2 cups raw almonds or 1 3/4 cups almond meal
1/2 cup dates, seeds removed
pinch sea salt

Grind almonds in a food processor until fine. Add the dates and salt and process again until you have a mixture that sticks together when you press it with your fingers. Dump into a glass pie plate and press to form a crust covering the bottom and the sides.

filling:
4 cups fresh blueberries (I used 2 pints and had enough)
2 average size bananas
1 1/2 Tbls raw honey

Set aside a little over a half of a cup of blueberries. In a food processor place remaining blueberries along with the bananas and honey and process until smooth. In a bowl or in the food processor container after taking out the blade, stir in the whole blueberries setting aside a small handful. Pour into pie crust and garish with remaining handful of blueberries. The filling will be runny, but it will gel up in the fridge. Refrigerate for at least 3 hours and serve.


There was a pint of blueberries left and some of the almond crust mixture, so I decided to create a breakfast cracker. My kitchen was overflowing with leftover almond crust because I had soaked the 2 cups of almonds which caused them to swell. As a result there was more crust than needed and it also was not sticking together well because it was so wet. Soaking raw almonds overnight removes the enzyme inhibitors in the skins so that they are easier to digest. When using almonds in raw food recipes it is recommended to soak them and then dehydrate them until crunchy. It really does make the almond taste better in my opinion.

For the breakfast crackers I used raw buckwheat, ground up into flour and then mixed with water to create a batter. The blueberries were put in the food processor with one banana and a handful of dates and processed until smooth but a bit chunky. The blueberries were incorporated into the buckwheat batter along with a half a cup or so of the almond mixture and spread it onto dehydrator sheets lined with parchment paper.

I dehydrated them for about 12 - 18 hours at 104 degrees F until crunchy and then broke them into pieces and put them in a covered container in the refrigerator. They don't taste that sweet by themselves, but Matt and I have come up with a couple ways to enjoy them.

Matt prefers spreading organic strawberry all fruit jam on top. I prefer a raw chocolate spread. Love Street Living Foods makes an amazing chocolate coconut spread. It is delicious topped with some sliced bananas and makes a great light breakfast.

Experiments will be continued with this breakfast cracker recipe. Sprouted buckwheat would make it more nutritious, so I would like to try sprouting and dehydrating the buckwheat before grinding and mixing it up into a batter. Hopefully there will be a perfected recipe for you all in the near future.

How do you love to use blueberries? I would love to hear from you!